Tuesday, February 15, 2011

How to Make Scallion Brushes

Usually my garnishes consist of chopped parsley and/or green onion.  Maybe a sprig of some miscellaneous herb.  Maybe some shaved Parm.  A Parmesan crisp if you're lucky.

I don't do radish roses or lemon crowns or carrot flowers.  I'm not much into fancy knife work.

In fact, as I type this, I'm nursing a throbbing nicked finger...proof that I'm a bit of a spaz.

But you knew that.

One thing I've learned how to do and enjoy doing (because I've never cut myself doing it) is make scallion brushes.  I think they're fun and festive. 


You'll need scallions, a sharp paring knife, and a bowl of ice water.


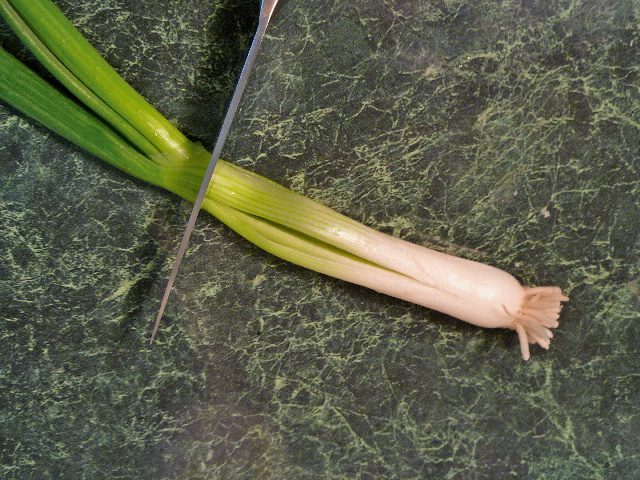
Cut the scallion lengthwise starting at the white portion.  Continue cutting up into the light green portion, stopping just before the leaves diverge. 

Don't cut all the way through to the other side. Use the knife tip to cut almost halfway into the scallion.

Make about 4 evenly spaced cuts.
By the way, there's my cut finger.  Isn't big, but it sure is deep.

Remove the top portion of the scallion at the point where your cuts end.


Submerge in ice water, gently pushing the scallion against the bottom of the bowl to fan out the leaves. 
Allow to soak for 15-20 minutes for the leaves to curl.

Now go find something to decorate!
Mom's Crab Dip

Wednesday, April 28, 2010

How to Make Flour Tortillas

Sometimes I don't have the time.
Most of the time I'm too lazy.
The majority of the time I don't feel like all the extra dishes.
Which I guess is the same as being lazy.


But I really should make homemade tortillas more often. They're soft and chewy and not at all like store-bought tortillas. All around heavenly.


They aren't hard to make. And they don't take that much time. I use tortillas for all sorts of things around here. I like to keep them around for quick/easy lunches. You'd be surprised by how many leftovers I've wrapped up in tortillas.


One of the most simple and delicious things to do with homemade tortillas is to spread them--still warm--with a little butter and eat as is. Sigh.

This recipe comes from Bren who used to belong to my recipe swap group on babycenter.  She has no idea how happy she makes my family every time I make these.

You'll need: flour, baking powder, salt, warm water, Crisco (that's it!).  Wheat flour can also be subbed for up to 1/2 of the white flour. 

Mix the dry ingredients together.  Add the Crisco and work it in to the dry ingredients until the mixture is coarse and resembles little pebbles.  I'm a big fan of using hands for this. 
Add in the water and mix until a dough forms.  Again with the hands.
Would ya turn on the faucet for me?

Cover the dough and let rest for about 15 minutes. 
Divide into 12 sections. Roll each into a ball.

On a floured surface, pat out with your hands.  Roll out into thin circles...or almost circles.

Cover the tortillas so they don't dry out. 
Preheat a skillet.  Add a tortilla and cook until the surface starts to bubble and the side facing down has browned.  Flip and brown the other side.


Spread with butter and eat immediately.  Or, keep warm and use for any number of things.  Like chicken, blue cheese, and carmelized onion quesadillas.


Homemade Tortillas
from Bren
Makes 12 tortillas


2 cups unbleached all-purpose flour
1 tsp. salt
3/4 tsp. baking powder
3 Tbs. shortening (Crisco)
2/3 cup warm water

In a large bowl, mix flour, salt, and baking powder. With your fingertips, rub in the shortening until crumbly. Stir in the water and knead lightly to a soft dough. Cover with clear plastic wrap and leave to rest for 15 minutes. Divide into 12 pieces and shape into balls. Roll out on a lightly floured surface in 6-7" rounds. Re-cover to keep moist as you prepare to cook them.

Heat a heavy frying pan or tortilla griddle and add one tortilla. Cook for 1 1/2 to 2 minutes, turning over as soon as the surface starts to bubble. It should stay flexible. Remove from the pan and wrap in a clean dishtowel or place in a tortilla warmer to keep warm while cooking the remaining tortillas. Optional: Brush with butter just as you are about to serve.

Notes: can sub some wheat flour for white.

Tuesday, January 5, 2010

How to Make Shrimp Stock

The dirty way.

First, every time you buy shell on shrimp--even if it's just tail on--save those shells in your freezer.  You're buying per pound and those shells count as part of the pound.  Why waste them?

Every time you peel onions, garlic, and carrots, and chop celery, save the scraps and peels (except for any with bad spots) in your freezer.

My quick and dirty way of making any stock, not just shrimp, is to never buy anything specifically for stock making. 

I'm running a household here, not a restaurant.  Yeah, you right, girl!


Chefs usually saute the shrimp shells before adding to the stock.  That is supposed to release more flavor from the shells--like roasting beef bones for beef stock.  If I have time I do this.  If I don't...then I don't.  And I don't feel guilty about it or think that I'll go to foodie hell.  Honestly, I think my shrimp stock comes out A-ok without that step.


Add the shrimp shells and the frozen vegetable pieces parts to your pot.  Add cold water--enough to double the volume of the pot.  Peppercorns can be added if you have them.  Don't go buy any if you don't. 


Bring just up to a boil, but not a full boil.


Simmer for about an hour.  Shrimp stock doesn't require the all day simmering like chicken stock does. 

Some people don't make shrimp stock because they worry about shrimpy odors.  I don't find that shrimp stock makes the house smell like the dumpster behind the seafood market.  I think it smells like a yummy shrimp soup and it makes me hungry while it cooks.


Strain the stock, pushing on the shells and vegetables to make sure you get every drop out of them.


Let the stock cool.  You shouldn't need to remove any fat.  Shouldn't be enough to worry about.


Divide, label, and freeze.

Use in Shrimp Creole, seafood gumbo, seafood jambalaya, bisque, and so on.  Much tastier than using water.


Tuesday, December 8, 2009

How to Make a Basic White Sauce (Béchamel)

Béchamel, or white sauce, is one of the "Mother Sauces" in French cooking. It's a handy thing to know how to make since it's a building block for other sauces.
And ya know I like to make it because it involves making roux.

The basic ingredients are in the foreground: flour, butter, milk, salt.  Do you even need to run to the store for this?

Béchamel can be used in manicotti, lasagna, and other baked pastas, or to top croque monsieur.  Add some garlic and Parmesan and you have yourself a nice sauce for a white pizza.  Add some cheddar and dry mustard and you have a cheese sauce that can be used on vegetables or as a dip.  Flavor as you'd like and use in place of cream of xyz soups.  Change the milk to cream and you have a nice cream sauce. 
You get the idea. 

Equal parts of flour and butter are used.  The amount of butter and flour you use compared to the amount of milk determines how thick your sauce will be.  I shoot for a medium thickness most of the time.  That works for me in most dishes.

Start by making a roux.  Melt the butter on low heat. 

When the butter gets nice and foamy, add the flour, stirring to avoid lumps.

Cook the roux on low heat, stirring constantly.  Bechamel requires a French roux not a Cajun roux...which means a white or blonde roux rather than a dark one.  When the roux bubbles, it's time to move on.

Add milk that has been heated.  Don't use cold from the fridge milk or your sauce may separate.  Slowly stir in the milk to prevent lumps.  I need more hands.  Season with salt.  Pepper and nutmeg are also common additions.

Cook, stirring, until the sauce thickens enough to coat the back of a spoon...or spatula in this case.  Why dirty something else?

Now the fun really begins.  Create your own sauce from the béchamel by adding other things.  I'm making a dipping sauce for soft pretzels.  I've added about 3/4 c grated cheddar and about 1 Tbsp of pickled jalapenos.


Basic White Sauce (Béchamel)from Ms. enPlace
* this makes 1 cup of sauce and can be doubled, tripled, halved, etc.
* these proportions are for a medium thickness
* for a thinner sauce, use half as much butter and flour
* for a thicker sauce, use double butter and flour

2 Tbsp unsalted butter
2 Tbsp all purpose flour
1 c hot milk
1/4-1/2 tsp salt

Melt butter over low heat until foamy.  Sprinkle in the flour and make a blonde roux by cooking and stirring.  When the roux bubbles, slowly pour in the hot milk while stirring.  Season with salt.  Cook until sauce has thickened.

This is an all-purpose sauce.  A variety of other ingredients can be added, such as garlic, Parmesan cheese, cheddar cheese, dry mustard.

Saturday, November 28, 2009

How to Make Homemade Tartar Sauce

Once you make this, you'll never, ever buy premade in jars or bottles again.

Bonus: the ingredients are common ones.  No weirdness here.

Here's what you'll need: good mayo, pimentos, parsley, onion, pickles and a little pickle juice.  If you're feeling lively, add a sprinkle or two of Creole Seasoning.


I don't like tartar sauce to be chunky, chunky--so I grate the onion (actually I use a microplane) and I finely chop the pickles and parsley.  I buy the pimentos already diced.  It's hard to screw this up and easy to adjust to what you like.

If you're thinking about skipping the pimentos because you'll have extra and won't know what to do with it, don't.  In addition to adding flavor, they also add nice color.  Buy a small jar and use what's left to purty up green beans or corn.

Add all of the above to the mayo.  Add 1-2 tablespoons of pickle juice.  Season with Creole seasoning if you feel like it.  Mix it all up.


Make this well before you need it...the day before if you can. The flavors really come together over night in the fridge.  Use to dress Fish Po'Boys or as a condiment for fried seafood.

As Mr. Burns would say..."Let the fools have their tar-tar sauce."  Bottled that is.


On to the recipe...
* This makes about 1 cup of tartar sauce.
* Ingredient amounts can easily be adjusted to personal tastes (for example, I usually add 3 Tbsp of chopped pickles)

Homemade Tartar Sauce
from Ms. enPlace

1 cup (good quality) mayonnaise (NOT Miracle Whip)

2-3 Tbsp finely chopped dill pickles
1 Tbsp chopped fresh parsley
2 tsp diced pimento
1-2 tsp grated onion (or finely chopped)
1-2 Tbsp pickle juice

(Chopped green onion can be used instead of yellow onion.  Creole seasoning can be added to taste for kicks.)

Combine all ingredients and refrigerate for at least 1/2 hour before using.  Overnight is best.

Tuesday, July 7, 2009

How to Roast Garlic

Roasting garlic at home: It's not hard, adds great flavor to many things, and makes your kitchen smell all garlicky and wonderful. If you like garlic.


You'll need garlic (just seeing if you're paying attention) and olive oil. I'm splitting this into two different methods. The first doesn't require anything special. Just foil. Heavy duty if you have it. The second method uses a garlic roaster. More on that later.


First, slice the top off the garlic and remove some of the excess outer paper.


Method #1


Place the garlic on a piece of foil and drizzle with olive oil.


Wrap the garlic up in the foil. I place this in an oven safe dish or on a sheet pan...just in case. I like the smell of roasting garlic, but not burning oil. Just my preference.


Roast at 350-400 for about 50 minutes. The garlic should be squishy and squeeze right out of the papers. Oh, and hey...the leftover oil is good too. Don't toss it.


Method #2


Normally I don't clutter my kitchen with single-purpose gadgets. I like practical. I like versatility. I like things to be adaptable. But my mother in law thought I needed this thing. I have to admit that it works well. And I like that it is reusable. And it isn't quite as one-dimensional as I thought. Onions can be roasted in it too.

The directions recommend soaking the cover in cold water for 15 minutes before using. Place the garlic on the saucer and drizzle with olive oil.

Place cover on saucer and roast at 350 for about 50 minutes--check manufacturer's instructions. Also check instructions for care. Unglazed surfaces should not be washed with soap.

Oh, yeah!

For either method, you'll know the garlic is done when it gets all squishy and can be squeezed from the paper. Add to salad dressings, vegetables, sauces, pasta, sandwiches, spread on bread like butter.

Tuesday, June 23, 2009

How to Peel a Tomato

I'm just going to say it even though I know people will give me good reasons. I don't know why one would spend one's time peeling tomatoes. I mean, what's a little tomato skin anyway?

Even more puzzling to me is seeding a tomato! That gets rid of the best part as far as I'm concerned. I can see the need for removing the juices in some recipes, such as tomato pie, but not for very many that's for sure.


But back to peeling. Have you ever tried to pick up a tomato and start peeling away? Not as easy as it sounds. While the method below creates more dirty dishes than I'd like, it really does make peeling tomatoes simple. Not that tomatoes are peeled in my kitchen.

My friend and former co-worker Chef Max liked tomatoes to be peeled and seeded. Even though I had internal struggles with this, I dutifully peeled the tomatoes as instructed...


Start by bringing water to a boil. Fill a bowl with water and ice cubes and have it waiting.

Cut an "X" across the bottom of the tomato.

Carefully place the tomato in boiling water for a few seconds.

The skin will start to peel away where you made your X.

Remove from boiling water and dunk in the ice water to quickly cool it down.

The skin will easily slip off.